How to write RiskScape expressions
RiskScape expressions are an integral part of model pipelines.
RiskScape expression language explains in more detail what expressions are, whereas this page will look at practical examples. We will start off with the basics, and gradually cover some of the more nuanced aspects of expressions.
Before we start
This tutorial is aimed at people who already have experience running RiskScape models, but want more flexibility in how they can customize their models and the results they produce. We expect that:
You are familiar with using a command line in either Linux or Windows.
You feel comfortable doing some basic coding, such as in Python, R, or SQL. Or you are proficient with using spreadsheet formula and have a willingness to learn.
You have RiskScape installed on your system.
The aim of this tutorial is to give you enough knowledge to take a pipeline generated by the wizard and start modifying some of the expressions in it yourself.
Setup
Click here to download the example project we will use in this guide.
Unzip the file into a new directory, e.g. C:\RiskScape_Projects\.
Open a command prompt and cd to the directory where you unzipped the files, e.g.
cd C:\RiskScape_Projects\expressions-tutorial
You will use this command prompt to run the RiskScape commands in this tutorial.
The unzipped project contains a few Python functions and a simple model. This data is similar to the Upolu tsunami data that we used in the previous tutorials.
Note
This input data was provided by NIWA and is based on published research papers. The data files have been adapted slightly for this tutorial.
Most expressions we will use in this tutorial can be run independently of any project. However, this project will give us some practical examples to test out expressions.
The basics
All RiskScape models are based on an underlying data-processing pipeline. Pipelines are a series of linked data-processing steps. The processing in each step is typically described using RiskScape expressions.
Expressions are simple statements - they resemble the formula you might enter into a spreadsheet cell, or python one-liners. Expressions allow you to transform your input data as it flows through your model pipeline.
This tutorial will use the riskscape expression evaluate command, which evaluates a single RiskScape expression and displays the result.
This lets us test out RiskScape expressions before we use them in a pipeline.
The command is similar to the Python interactive console, if you have used that before.
Tip
You can also use the riskscape expr eval command alias to evaluate expressions.
It behaves exactly the same as riskscape expression evaluate, but is slightly shorter to type.
Let’s try it now with the simplest possible expression. Type the following into the command prompt where you would normally run RiskScape.
riskscape expression evaluate " 1 + 1 "
Note
The expression itself needs to be enclosed in double-quotes here, purely for the command-line. When you use an expression in a pipeline you will not need the double-quotes like this. We have left spaces around the double-quotes so that the standalone expression is easier to see, but make sure you copy both double-quotes.
Types
All the data used in a RiskScape model has an underlying data type. RiskScape expressions are the same - every part of the expression has a type.
Common simple types are Text strings, Integer, Floating, Boolean, and Geometry.
RiskScape also supports complex types, like List and Struct, which we will cover in more detail later.
The type is important, as many operations will not work if one of the input types is incorrect.
For example, adding two Text strings together is fine.
riskscape expression evaluate " 'abc' + 'xyz' "
Whereas adding together two different types can produce an error.
riskscape expression evaluate "  1 + 'xyz'  "
 Failed to evaluate expression
   - Operator '+' is not supported for types '[Integer, Text]'
Note let’s try adding an Integer and a Floating value together.
Remember that an Integer is always a whole number, whereas Floating values always have a decimal point.
riskscape expression evaluate " 1 + 2.5 "
In this case it works, even though the two numbers are different types.
This is called type coercion - RiskScape turned the Integer value into a Floating value.
The rules of coercion are complicated, but it basically means that when two different types are compatible, RiskScape will ‘make do’ with the values it was given.
Tip
You can see a list of all the built-in types that RiskScape supports using the
riskscape type-registry list command.
Function calls
Of course, expressions can do much more interesting things than just adding two numbers together. In general, more complicated operations will involve a function call.
If function calls are new to you, don’t panic.
They’re a bit like the function formula you would use in a spreadsheet, e.g. SUM() or MAX().
A function call executes a named piece of code by giving it some specific values. The values you pass to the function are called the function arguments. RiskScape provides some common built-in functions for you, but you can also add whatever user-defined functions you want.
For example, the following function call will generate a random number between zero and one. Try running it a few times and check you get different numbers.
riskscape expression evaluate " random_uniform(0, 1) "
Tip
Each built-in function comes with some basic documentation that will help you understand how to use it.
You can read this help documentation using the riskscape function info FUNCTION_NAME command.
You can see a list of supported functions using riskscape function list --all.
Try reading more about the random_uniform() function now, using the following command:
riskscape function info random_uniform
Did you notice that the function expects Floating argument-types, but we passed it Integer values?
That’s coercion at work again.
Functions can have optional function arguments that can be omitted.
You can also specify the argument keyword names as part of the function call.
As an example, log() accepts an optional ‘base’ argument, but defaults to natural log if no base is specified.
riskscape expression evaluate " log(10) "
Whereas specifying a different base changes the result (with the argument keywords used for clarity).
riskscape expression evaluate " log(x: 10, base: 10) "
Tip
You can call your own user-defined Functions from any expression, just like you can with the built-in RiskScape functions.
Conditional logic
You may find cases where you want to use some basic if-then-else logic in your pipeline.
RiskScape has an if() function to assist us in these cases.
The if() function takes a Boolean (true or false) ‘condition’ argument, and then returns one of two values depending on whether or not the condition was true.
As an example, here’s an expression that simulates tossing a coin. Try running it a few times to check you get both heads and tails.
riskscape expr eval " if( random_uniform(0, 1) > 0.5, then: 'Heads', else: 'Tails' ) "
Here the condition is whether a randomly generated number is greater than 0.5. If the condition is met, we say the coin toss was ‘Heads’. If not, we say it was ‘Tails’.
Note
In this example we use the > greater-than operator.
Other comparison operators you could use include >=, <, <=, = (equal), and != (not equal).
As an aside, in this particular case we could use another function here instead to make the expression a lot simpler, e.g.
riskscape expression evaluate " random_choice( ['Heads', 'Tails'] ) "
Tip
If you are unsure of the exact function name, riskscape function info will suggest similar alternatives.
For example, try entering riskscape function info random - it will list the functions with ‘random’ in their name in the error message.
This can help you to discover what built-in functions RiskScape supports.
It is important to note that if() is simply another RiskScape function call,
rather than a programming language construct, like it is in other languages like Python.
This difference is a bit academic, but it means that the if() function will always evaluate both
the then and else statements, even though only one of them will be used.
For example, try running the following command:
riskscape expr eval " if( true, then: 'Heads', else: int('Tails') ) "
Evaluating the else case results in an error, even though that condition is never actually used.
Tip
If you are comfortable with programming, you can use something called a lambda to avoid this situation. We’ll touch briefly on what a lambda is later in this tutorial.
Structs
A struct is a RiskScape type that is used to group together a set of attributes.
Attributes in your input data, such as shapefile data, are typically simple types, such as Floating, Integer, Text, etc.
Whereas a Struct is a compound type that is made up of one or more other types, called struct members.
You can define a new instance of a Struct type within a RiskScape expression, for example:
riskscape expression evaluate " { foo: 1 + 1, bar: 3.5 } "
This creates a struct instance with two member attributes: an Integer called foo, and a Floating called bar.
Tip
You may notice that the syntax looks quite similar to defining a dictionary in Python. You can think of struct instances as being a lot like dictionaries in Python - both consist of a set of key-value pairs. In fact, when a RiskScape struct instance is passed to a Python function, it becomes a Python dictionary.
Often RiskScape pipelines will use as to name the member attributes in the struct.
The following expression produces the same struct as the previous example.
riskscape expression evaluate " { 1 + 1 as foo, 3.5 as bar } "
You can also use much more complicated expressions, such as function calls, when defining struct members, e.g.
riskscape expression evaluate " { foo: max(1, 2), bar: random_uniform(3.4, 3.6) } "
Using Structs
You may often only be interested in one particular attribute, or struct member, rather than the whole struct.
For example, trying to pass a whole struct to the round() function results in an error because the argument type does not match.
riskscape expression evaluate "  round( { foo: 1, bar: 2.5 } )  "
 Failed to evaluate expression
  - Problems found with 'round' riskscape function
    - Type mismatch for 'number' function argument.
      Expected 'Floating' but found '{foo=>Integer, bar=>Floating}'
In this case, we can use the . operator to access the struct member we’re interested in (bar). E.g.
riskscape expression evaluate " round( { foo: 1, bar: 2.5 }.bar ) "
Note
This example looks a little strange because we’re defining the struct and accessing a struct member at the same time.
Normally accessing a struct member would look more like exposure.geom or consequence.loss.
Sometimes you can in fact pass the whole struct to a function, thanks once again to the magic of coercion.
This only works if it’s obvious from the Struct type what you want to do,
such as when the struct only has one member, like the following example:
riskscape expression evaluate " round( { bar: 2.5 } ) "
Pipeline data
These examples to create structs may not seem particularly exciting, but structs are a fundamental part of pipelines. Structs allow you to organize your pipeline data, so that you can transform the data more easily.
For example, say your function needs values for 10 different attributes of a building before it can calculate its damage. It’s a lot simpler to pass your function one ‘building’ struct as an argument, rather than 10 individual arguments.
Every single row or record in your input data gets turned into a struct instance. These struct instances get transformed (i.e. combined, split up, or manipulated) as they move from one pipeline step to the next.
So each pipeline step produces a new struct instance as output, which then becomes the input struct instance for the next step. We call these struct instances Tuples, which represent a row of model input data.
The following diagram shows a simple example where only three tuples, or rows of data, are shown.
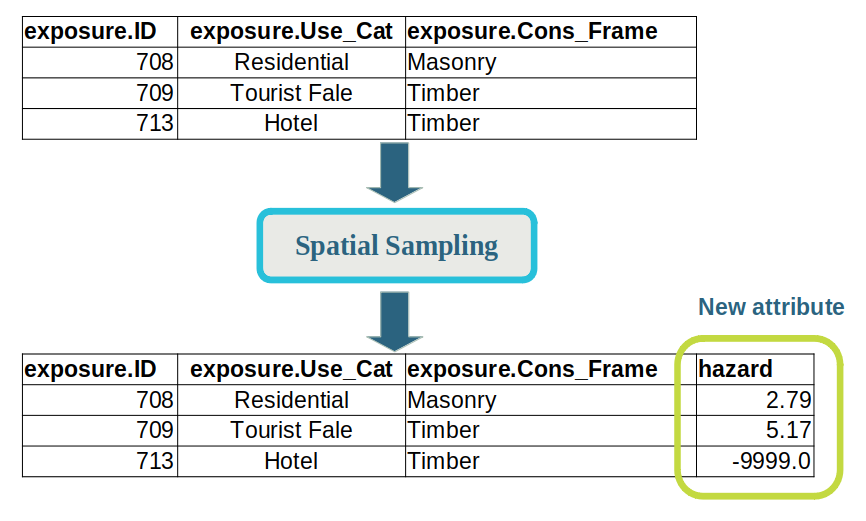
Prior to the ‘Spatial Sampling’ pipeline step, the tuple contains an exposure struct that contains the exposure-layer input data.
The type information for the tuple would look like: { exposure: { ID: integer, Use_Cat: text, Cons_Frame: text } }.
After the ‘Spatial Sampling’ pipeline step, a hazard attribute is added, that contains the hazard intensity measure sampled from the hazard-layer.
The type information for the tuple would now look like: { exposure: { ID: integer, Use_Cat: text, Cons_Frame: text }, hazard: Floating }.
Casting
For many simple types, you can change the underlying type using a casting function, E.g.
riskscape expression evaluate "  1 + int('2')  "
riskscape expression evaluate "  str(1) + 'xyz'  "
You can also use round() to convert a Floating number to an Integer value, e.g.
riskscape expression evaluate " round(1.95) "
Tip
Input data from a CSV file will always be Text type.
So you will need to use casts to turn any numeric CSV values into Integer or Floating values.
This can be done in the bookmark INI definition, by using set-attribute.foo = int(bar).
Refer to the tutorial on bookmarks for examples of this.
Lists
Lists are declared as a comma-separated series of items enclosed in [ ] square brackets.
This is similar syntax to Python, e.g.
riskscape expression evaluate " length( [1, 2, 3] ) "
Aggregation
The mean() function is an Aggregation operation - it takes a bunch of numbers and combines them into a single result (or a group of results).
Other common aggregation functions include max(), sum(), count(), and stddev().
Aggregation expressions are a special type of expression.
They mostly only get used in aggregation pipeline steps (i.e. the group step).
Normally an expression only applies to one row of input data at a time. Aggregation expressions are different in that they apply to a column (or attribute) across all rows of input data.
Another way to think of it is using an aggregation expression in RiskScape is a lot like using SUM() on a spreadsheet column.
Unfortunately, we can’t test aggregating rows of data using the riskscape expression evaluate command.
However, we can still use the aggregation functions on lists.
Instead of aggregating columns of input data, the function aggregates every item in the list.
Try calling some aggregation functions with a simple list.
riskscape expression evaluate "  mean( [1, 2, 3, 4, 5] )  "
riskscape expression evaluate "  median( [1, 2, 3, 4, 5] )  "
riskscape expression evaluate "  sum( [1, 2, 3, 4, 5] )  "
riskscape expression evaluate "  max( [1, 2, 3, 4, 5] )  "
riskscape expression evaluate "  percentile( [1, 2, 3, 4, 5], 90 )  "
Note
Aggregation can change the type of your data. You may have noticed that some aggregation functions always produce a Floating result, even though the list contains Integer values. This is because they use division, and dividing integers always results in a floating-point value.
Nullable
Occasionally you might notice that RiskScape says one of your types is Nullable.
This happens when the underlying value may or may not exist.
Usually a Nullable type occurs from sampling the hazard-layer with your exposure-layer geometry.
The exposure geometry might fall completely outside the hazard-layer’s bounds, in which case there is no possible value to return.
So RiskScape returns Nothing (this is the equivalent of None in Python terms).
The important thing to know is that Nullable types are sticky.
Any other types that come into contact with a Nullable type get tainted by association.
For example:
riskscape expression evaluate " { foo: 1 + null_of('integer') } "
In this case, the type of foo is Nullable because part of the expression was Nullable.
The value of foo is actually null, or Nothing, because part of the expression was null.
Note
RiskScape automatically checks your expressions for null safety. If a null value is used in an operation that does not expect null values then the result will be null.
Assignment
You may have noticed we have only mentioned the = equals sign once so far, and that was for checking equality, e.g.
riskscape expression evaluate " 1 = 1 "
RiskScape expressions never update an existing value in a struct or tuple, and so you will never use = for assignment (setting a value).
Instead, RiskScape always creates a new struct instance with the modified value.
This point may seem a bit academic (and it is - it’s based on a Functional Programming paradigm).
All you need to know for now is that you will never use = to set values (nor will you use += or -=).
Lambda expressions
Note
Lambdas are a fairly advanced programming concept, and are used infrequently in RiskScape. We cover lambdas for completeness here, but do not worry too much if this next section does not make a lot of sense to you.
A lambda is essentially an anonymous function - it’s a small RiskScape expression that is defined inline,
typically as an argument to another function.
Lambdas are defined within a function call by using the -> operator.
Note
The -> operator is also used outside of function calls to chain pipeline steps together,
which is completely different to lambda expressions.
We will learn more about pipeline steps in the next tutorial.
A simple example of a lambda might be to double a number’s value.
For example, given a value x, we want to return x * 2.
As a lambda expression, this would look like x -> x * 2.
You can try this out using the map() function.
The map() function applies a lambda to each item in a list.
Try running the following command:
riskscape expression evaluate " map( [1, 2, 3], x -> x * 2 ) "
The result should be that the numbers [1, 2, 3] have all doubled.
Going back to an earlier example, the following command will throw an error
because the else case is still being evaluated even though it is not used.
riskscape expr eval " if( true, then: 'Heads', else: int('Tails') ) "
However, a lambda only gets evaluated when it is actually used.
If we use a lambda in the else case, then the error goes away because the else case is never used, e.g.
riskscape expr eval " if( true, then: 'Heads', else: () -> int('Tails') ) "
Tip
Lambdas can help you to avoid doing unnecessary work in your pipeline.
This can be useful in conditional logic (i.e. if()) where one of
the conditions does not make sense in certain cases, or may involve
a lot of processing overhead.
Practical applications
We have covered the basic syntax of RiskScape expressions and how they work. Now let’s look at some practical applications of using expressions in your models.
Extending wizard models
Many of the parameters that wizard models take are simply RiskScape expressions.
The wizard will help you build simple expressions interactively, but these are fairly limited in what they can do. However, you can take a saved configuration for a wizard model and modify the expressions manually.
Let’s use the following model in the project.ini file as an example:
[model example]
description = Simple model with expressions that we can modify
framework = wizard
input-exposures.layer = data/Buildings_SE_Upolu.shp
input-exposures.geoprocess = false
input-hazards.layer = data/MaxEnv_All_Scenarios_50m.tif
sample.hazards-by = CLOSEST
analysis.function = is_exposed
report-event-impact.filter = hazard > 0
report-event-impact.group-by[0] = exposure.Cons_Frame
report-event-impact.aggregate[0] = count(exposure) as Total_buildings
report-event-impact.aggregate[1] = mean(hazard) as Average_depth
report-event-impact.select[0] = *
Currently the model reports the Average_depth in metres.
If we wanted this result recorded in centimetres instead, the interactive wizard currently cannot help us build that expression.
However, it would simply be Average_depth * 100.
If we wanted to control the name that the new attribute gets, we could use Average_depth * 100 as Average_depth_cm.
If we wanted to round the result to the nearest centimetre, we could use round(Average_depth * 100).
Try running the model using the following command:
riskscape model run example -p "report-event-impact.select[1]=round(Average_depth * 100) as Average_depth_cm"
This command adds an extra Average_depth_cm to the event-impact.csv results file, which should look like this:
Cons_Frame,Total_buildings,Average_depth,Average_depth_cm
Reinforced Concrete,2,1.0038375854492188,100
Masonry,1608,2.3271826401130475,233
Steel,5,2.5543127775192263,255
Reinforced_Concrete,10,2.543464779853821,254
,3,1.3111796379089355,131
Timber,431,3.2016472523284345,320
Tip
Usually it’s simpler to modify the expression in the project.ini file directly, rather than
using the -p or --parameter CLI options to change the model parameter on the fly.
Expression scope
An expression in a model pipeline will operate on the tuple, i.e. the row of data currently being processed. This mean the expression can access any attributes that are currently present in the tuple.
Note
As the tuple moves through the model pipeline, the attributes it contains will change. So the attributes that are available to your expression will depend on where in the pipeline the expression is used.
The interactive wizard can help you determine what attributes you can use.
Another alternative is to simply try to access an attribute that you know will not exist (e.g. foo),
and RiskScape should tell you what attributes are available in the error message.
For example, try running the following command:
riskscape model run example -p "report-event-impact.select[1]=foo"
This should produce the following error:
There was a problem with the parameters for wizard model
  - Failed to load the saved model. Some parameters specified may be invalid. If you have altered parameters manually,
    try going through the interactive wizard again
    - Problems found with 'report-event-impact.select' parameter
      - Failed to validate 'select({*, foo})' step for execution
        - Failed to validate expression '{*, foo}' against input type {Cons_Frame=>Text, Total_buildings=>Integer,
          Average_depth=>Nullable[Floating]}
          - Could not find 'foo' among [Cons_Frame, Total_buildings, Average_depth]
The last line lists the names of the available attributes, which are: Cons_Frame, Total_buildings, Average_depth.
The select parameter is one of the last steps in the model, so these attributes correspond to what gets saved in the event-impact.csv file.
Let’s try the same thing with an earlier step in the model pipeline:
riskscape model run example -p "report-event-impact.filter=foo"
This time the available attributes are exposure.the_geom, exposure.Use_Cat, exposure.Cons_Frame, exposure.area, exposure.perimeter, hazard, consequence.
Tip
Remember that exposure is a struct and the member attributes it contains correspond to
the attributes in the exposure-layer input file.
Aggregation expressions
Let’s take a look at using expressions to aggregate the results of the model.
Open the project.ini file in Notepad, or your preferred text editor, and look at lines 10-12:
report-event-impact.group-by[0] = exposure.Cons_Frame
report-event-impact.aggregate[0] = count(exposure) as Total_buildings
report-event-impact.aggregate[1] = mean(hazard) as Average_depth
The right-hand side of the = are all expressions that control how RiskScape will aggregate the model data.
The report-event-impact.group-by model parameter specifies the attribute(s) that we group the event-impact results by,
and the report-event-impact.aggregate parameter specifies how to aggregate the results.
Try changing these three lines to the following:
report-event-impact.group-by[0] = exposure.Use_Cat
report-event-impact.aggregate[0] = sum(exposure.area) as Building_m2
report-event-impact.aggregate[1] = stddev(hazard) as Depth
Save the project.ini file, and re-run the model using the following command:
riskscape model run example
It should produce an event-impact.csv file that looks something like this:
Use_Cat,Building_m2,Depth.mean,Depth.stddev
Outbuilding,24355.417724609375,2.331427180173883,1.768794405391399
Industrial,1392.920654296875,2.7654923796653748,0.8030687924796163
Commercial,3797.490966796875,3.719742706843785,1.7849776453776574
Commercial - not verified,400.925048828125,,
Religious,17922.424560555002,1.8323415092059545,1.7242769315238138
Community - not verified,759.182861328125,5.0066187381744385,0.5218430592989689
Tourist Fale,2094.622802734375,3.8892281768477965,1.259292364541857
Commericial - not verified,184.406005859375,,
Hotel,19877.2353515625,3.390313490472659,1.8243371156722499
Education,5523.36743164,3.395870625972748,1.7343286937078735
,20.02490234375,1.3111796379089355,1.0634330871567976
Community,7328.067626953125,3.2658567169438237,1.298215930801334
Residential,149052.96362304688,2.2250018423603426,1.5794900709365927
Fale,6829.74169921875,2.7053862896051495,1.8508132278699894
Notice that the results are now quite different:
The results are now grouped by the building
Use_Cat, rather thanCons_Frame, due to the change in thereport-event-impact.group-by[0]model parameter.Instead of counting the exposed buildings, we now
sumthe building’s area (Building_m2).The
stddev()aggregation function outputs both the mean (Depth.mean) and standard deviation (Depth.stddev).
Testing functions
So far we have used expressions to call built-in RiskScape functions.
However, you can also use expressions to call your own, user-defined functions (i.e. ones that you add via the project.ini file).
This can be a helpful way to test that your Python code is working correctly.
The project.ini file contains a simple exposure_level function that can be used in RiskScape models.
This function takes two arguments: an element-at-risk and the hazard intensity measure.
Typically the element-at-risk will be some sort of Struct type, but here it can be Anything.
We can simply pass the function { } as an empty struct (i.e. a struct that has no member attributes).
The hazard argument takes a Nullable, Floating type.
Try calling the exposure_level function using the following command:
riskscape expression evaluate " exposure_level( { }, 1.5 ) "
Try a few different hazard values and check that the return value is sensible.
When the exposure is not exposed to the hazard, the hazard argument will be Nothing, or null.
You can test passing the function a null hazard value using the following statement:
riskscape expression evaluate " exposure_level( { }, null_of('floating') ) "
Tip
When you use CPython, you can also use the if __name__ == '__main__': Python idiom to run
your Python code manually and test that it works correctly.
Whereas using RiskScape expressions will work regardless of whether you are using CPython or Jython.
Declaring struct types vs instances
In the project.ini file, take a look at the [function exposure_level] section.
Notice that how we define the Struct type for return-type looks quite different to how we have been creating struct instances so far.
This difference is because the INI file defines an abstract ‘blueprint’ for the Struct type, whereas our expressions have created concrete instances of the struct.
In the project.ini file we define what the Struct type looks like without any values for the member attributes.
Whereas, with expressions we only have attribute values and RiskScape infers what type the member attributes must be.
Testing with element-at-risk data
Let’s look at another function, Samoa_Building_Fragility_DS5, which requires that a specific attribute (Cons_Frame) is present for the element-at-risk.
Its Python code looks like this:
def function(building, hazard_depth):
    DS_5_Prob = 0.0
    construction = building.get("Cons_Frame")

    if hazard_depth is not None and hazard_depth > 0:
        if construction == 'Steel':
            DS_5_Prob = log_normal_cdf(hazard_depth, 0.39, 0.4)
        elif construction == 'Masonry':
            DS5_Prob  = log_normal_cdf(hazard_depth, 0.39, 0.4)
        elif construction in ['Reinforced_Concrete', 'Reinforced Concrete']:
            DS_5_Prob = log_nomral_cdf(hazard_depth, 0.86, 0.94)
        else: # 'Timber' or unknown
            DS_5_Prob = log_normal_cdf(hazard_depth, 0.1, 0.28)

    return DS_5_Prob

def log_normal_cdf(x, mean, stddev):
    # this uses the built-in RiskScape 'lognorm_cdf' function
    return functions.get('lognorm_cdf').call(x, mean, stddev)
Using what we have learnt so far, we can create a struct instance that has a Cons_Frame attribute and pass that to our function.
Try running the following command:
riskscape expression evaluate " Samoa_Building_Fragility_DS5( { Cons_Frame: 'Timber' }, 1.1 ) "
Try varying the Cons_Frame value to check that the function behaves as expected. Note that:
The
Cons_Framecan beTimber,Steel,Masonry, orReinforced Concrete.Timber, Masonry, and reinforced concrete should all produce different results for the same hazard value.
If
Cons_Frameis unknown, then currently the function defaults to timber.
Note
This function contains two fundamental bugs.
See if you can find them by using the riskscape expression evaluate command to test the function.
One bug would prevent the model from running properly, whereas the other bug will produce the wrong model results.
Versatility of functions
In the tutorials so far, the focus has been on using Python functions to analyse the consequence that the hazard has on each element-at-risk. However, you can add your own Python functions and use them from any RiskScape expression.
Functions give you a lot of versatility as to what you can do in a model. For example, if you wanted to pre-process your input data or post-process your results further.
In your project.ini bookmark definitions, the set-attribute.ATTRIBUTE_NAME parameter simply takes a RiskScape expression.
So you could call your own user-defined Python function there to process the input data before it gets used in the model.
This lets you ‘clean’ the input data as part of the model, or reclassify attribute values to handle schema differences in the input data.
Similarly, in wizard models the report-event-impact.select parameter also takes any expression.
So you could also call a Python function there to process the results of the consequence analysis further.
Tip
If you want to use RiskScape functions in other places in your model besides the Consequence Analysis phase, there are Hello, world example for constructing RiskScape functions with different argument types.
Recap
We have covered a lot, so here are some key takeaway points:
Everything in RiskScape has a type.
The actual data type needs to match what is expected.
RiskScape can sometimes make do when two types are close enough (coercion).
Structs help to organize your data as it flows through the pipeline.
Each pipeline step transforms your data in some way.
Function calls are the real work-horse when it comes to transforming your data.
Most expressions only transform one row of data at a time. However, aggregation expressions work across all rows of data.
The
Nullabletype is ‘sticky’ and can taint other data types by association.You use
=for checking for equality, not==. You never use=to set a value.Many parameters in a wizard model are simply RiskScape expressions. Manually editing the expressions in the saved model configuration can give you better flexibility over what your model does.
You can add your own Python functions and use them from any RiskScape expression. This gives you a lot of versatility as to what you can do in a RiskScape model, such as pre-processing or post-processing the data.
You can use the
riskscape expression evaluatecommand to test that your function works correctly given various different arguments.
If you want to learn more about writing RiskScape pipelines, you could now look at the How to write basic pipelines tutorial.
Extra for experts
If you want to explore using RiskScape expressions a little further, you could try the following exercises out on your own.
By changing the arguments, try using the
random_uniform()function to generate a random floating-point number between 1 and 10. Try passing the result to theround()function to generate a random integer number between 1 and 10. Tip: the arguments for one function can be the return-value from another function.The
map()function is a handy way to transform or manipulate a given list of values. The second function argument is a lambda expression in the formlist_item -> new_value. The lambda expression describes how the list item should be transformed. Try evaluating the expressionsmap( [1, 2, 3], x -> x * 2 )andmap( [1, 2, 3], x -> pow(x, 2) )and see what they do.Using the
map()andrandom_uniform()functions, see if you can generate a list of 5 random numbers. How about 50 random numbers? Hint: RiskScape has arange()function that generates a list of numbers, similar torange()in Python.In the
examplemodel, try changing thesum(exposure.area)expression so that the result is rounded. There are two ways to do this - rounding each individual building area before you sum it, i.e.sum(round(exposure.area)), or rounding the total building area after you have summed it, i.e.round(sum(exposure.area)). The approach you choose will make a difference to the result you get.Try out the following aggregation concepts by modifying and running the
examplemodel.count(*)is a simple way to count everything.If you pass a boolean expression to
count(), it works like theCOUNTIFspreadsheet formula does, e.g.count(hazard > 0.5)
Common aggregation functions include
max,min,mean,median,mode,stddev, andsum. Try out any functions that you are interested in.There is also the
percentilefunction that takes a second argument, which is the percentile to use, e.g.percentile(hazard, 90). There is alsopercentiles, which takes a list of percentiles, e.g.percentile(hazard, [10, 25, 75, 90]).The
bucket_range()function is an advanced feature, but quite powerful. It lets you assign your data into buckets, or bins, and aggregate based on the bucket it falls into. Try out the expression:bucket_range(pick: hazard, select: { count(*) }, range: [ 1, 2, 3 ]) as DepthThis counts the number of buildings based on the range that the hazard value falls: <1m, 1-2m, 2-3m, 3m+.